Choosing an Aluminum Window for an overseas project involves more than comparing prices and frame colors. A polished product photo cannot show how a sash feels, how smoothly its locks engage, or whether its drainage design suits a rainy site. Small details matter. So do local conditions: coastal salt air, strong sun, driving rain, and seasonal temperature changes can all affect product selection.
Global buyers should compare frame profiles, glazing options, hardware, finishes, and installation requirements as one system. Request clear specifications, drawings, test information, warranty terms, and details about packaging and delivery. Check that quoted dimensions match the project schedule, including opening direction and any required screens. A few millimeters can create costly site adjustments. It happens.
Documentation is useful, but it does not replace careful questions. Ask who handles technical support, how replacement parts are sourced, and what the supplier needs before production begins. Review samples where practical, especially the finish and corner joints. No single window suits every building, and the lowest quote may leave important details unclear. These ten buying tips will help international purchasers compare offers more consistently, identify gaps before ordering, and choose products that fit the project’s climate, budget, and installation conditions. Real projects still bring surprises; a checklist reduces them, but cannot remove every one.
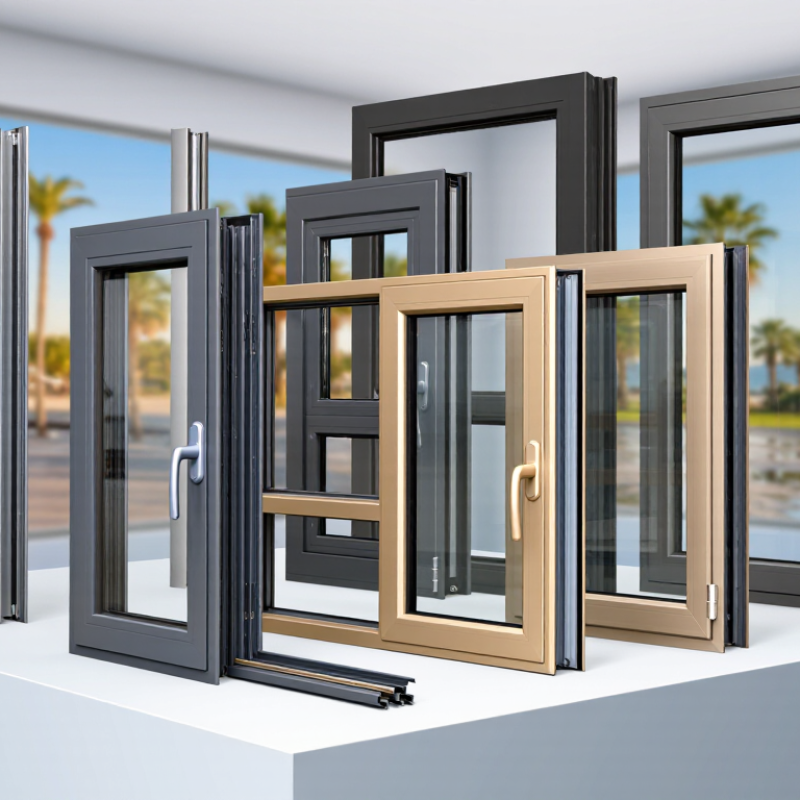
Aluminum windows vary by operation and purpose. Fixed units bring daylight but do not open. Casement windows swing outward and seal tightly when closed. Sliding windows save space, though their tracks need regular cleaning. Tilt-and-turn designs offer controlled ventilation and easier access for cleaning. Choose by room use, wind exposure, and maintenance access—not appearance alone.
The frame is only one part of the system. Check whether it has a thermal break, an insulating barrier between inner and outer aluminum. Also inspect the sash, glazing, spacer, seals, locks, and drainage paths. The U.S. Department of Energy estimates that heat gain and loss through windows account for 25–30% of residential heating and cooling energy use. A weak seal can undermine good glass. Small details matter.
Tip: Ask for a section drawing and product data showing frame depth, glass build-up, thermal-break width, air leakage, and water resistance. Compare the same test standards across suppliers. Confirm how drainage holes face after installation; a detail can look sound on paper and still be missed on site. I would also request a sample corner. Finish quality is easier to judge in your hand than in a brochure.
For global buyers, define the site conditions before comparing aluminum windows. Coastal homes face salt spray and driving rain; high-rise façades may need stronger wind-load performance. Ask suppliers for test reports covering air leakage, water penetration, and structural pressure—not just attractive catalogue ratings. Aluminum conducts heat readily, so check whether frames include thermal breaks and request whole-window U-factor and solar heat gain coefficient (SHGC) values. The U.S. Department of Energy estimates that heat gain and loss through windows account for 25–30% of residential heating and cooling energy use. The figure is U.S.-specific, but it shows why climate-fit glazing matters. Small detail. Big difference.
Comfort also depends on glare, condensation, and noise. In hot, sunny locations, a lower SHGC can reduce unwanted solar heat; in colder regions, a lower U-factor helps limit heat loss. The National Fenestration Rating Council’s ratings can help buyers compare these properties consistently. For safety, specify glazing and frame performance suited to the building’s location, height, and exposure, and verify compliance with applicable local codes. I would not choose by glass alone; frame connections and installation quality can become weak points.
Tip: Send suppliers the project location, orientation, floor level, and nearby noise sources. Request rated performance for the complete window assembly, plus installation details. If the data sheet is unclear, pause and ask for clarification.
| # | Buying tip | What to define | Practical guidance | What to verify |
|---|---|---|---|---|
| 1 | Start with the local climate | Typical and extreme temperatures, humidity, rainfall, wind, solar exposure, and distance from the coast. | A cold climate often prioritizes heat retention and condensation control. Hot, sunny climates often need solar heat-gain control. Coastal sites may require extra attention to corrosion resistance. | Confirm project conditions and applicable local building-code requirements with the design team. |
| 2 | Set a thermal-performance target | Whole-window U-factor or U-value for the complete assembly, not glass alone. | Lower U-factor means less heat transfer. Compare values using the same units, test method, and product configuration. The frame, glazing, spacers, and size can all affect the result. | Request certified or independently tested whole-window data for the specified size and opening style. |
| 3 | Choose solar control by orientation | Solar Heat Gain Coefficient (SHGC), visible transmittance, window orientation, shading, and cooling needs. | SHGC ranges from 0 to 1; lower values admit less solar heat. The preferred balance depends on climate, facade direction, daylight goals, and external shading. | Check the glazing specification and make sure SHGC and visible transmittance refer to the proposed glass build-up. |
| 4 | Specify a thermally improved frame | Whether the aluminum frame uses a thermal break and how the complete frame-and-glass system performs. | Aluminum conducts heat readily. A thermal break reduces heat flow through the frame, but it does not replace whole-window performance data or correct installation. | Ask for section drawings and test data for the actual frame series, glazing, and dimensions being quoted. |
| 5 | Set air-leakage requirements | Air leakage through the closed window under a stated test pressure and test standard. | Lower tested leakage generally helps limit drafts and uncontrolled air movement. Ratings are meaningful only when the test method, units, and product configuration are identified. | Request the laboratory report and confirm that seals, hardware, and opening style match the supplied product. |
| 6 | Match water resistance to exposure | Water-penetration test pressure, drainage design, wind-driven rain exposure, and installation details. | Exposed high-rise, storm-prone, and coastal locations may need different performance than sheltered sites. A window test does not assess the surrounding wall or installation joint. | Check tested results against the project specification and coordinate flashing, sill drainage, and perimeter sealing. |
| 7 | Account for wind and structural loads | Design wind pressure, building height, terrain, window size, and any impact or debris requirements. | Required pressure varies by site and building design. Larger units and corner or upper-floor locations can experience different demands from sheltered, low-rise openings. | Have a qualified project professional confirm design pressures and verify the complete window assembly against them. |
| 8 | Specify appropriate safety glazing | Glass type, location, human-impact risk, fall protection, and requirements in the jurisdiction of installation. | Tempered glass is designed to break into smaller pieces; laminated glass holds broken pieces together. Required applications depend on local codes and the opening’s location and use. | Confirm glass markings, safety-glazing documentation, and any separate fall-protection or impact requirements. |
| 9 | Plan for noise and indoor comfort | Outdoor noise source, glazing construction, frame seals, and acoustic rating such as STC or OITC where available. | Acoustic results depend on the entire window and installation. Different glass thicknesses or laminated glass may help, but performance should be evaluated for the noise of concern. | Request a rating for the complete window assembly and check that the test configuration matches the proposed design. |
| 10 | Check finish durability and operation | Coating or anodized finish, corrosion exposure, hardware material, operating force, drainage, and maintenance access. | Finishes and hardware should suit local moisture, salt, pollution, and cleaning conditions. Smooth operation depends on correct sizing, installation, and adjustment as well as product quality. | Review finish and hardware specifications, care instructions, warranty terms, and available replacement components. |
A strong aluminum frame should feel rigid at corners, with clean welds or tight mechanical joints and no sharp burrs. Ask for the alloy and wall thickness, not just a broad “heavy-duty” claim. A thermal break is important in hot or cold climates; check that the insulating strip runs continuously through the frame. Request test data for air leakage, water penetration, and structural performance. Numbers are more useful than showroom impressions.
Glazing changes comfort as much as the frame does. Compare double and triple glazing by whole-window performance, not glass thickness alone. Low-emissivity coatings can reduce heat gain, while laminated glass may help limit injury if it breaks. Check the spacer edge, seal condition, and stated U-value or solar heat gain coefficient. These figures need local climate context. A low U-value is not the only goal in every region.
Finishes deserve close inspection, especially for coastal sites or strong sun. Powder coating should look even around corners and drainage openings, with no thin patches or pinholes. Anodized finishes can show a different texture and color range, so review a physical sample outdoors. Ask how the coating was tested and what cleaning it requires. Samples can mislead. I would also check whether the selected color is available across every profile; mismatches are easy to miss in a small swatch.
10 Aluminum Window Buying Tips for Global Buyers
Evaluate Suppliers, Certifications, Pricing, and Delivery Terms
A reliable aluminum window supplier should provide factory details, production photos, and recent project references. Ask who controls alloy thickness, corner welding, hardware installation, and final inspection. A clean sample is not enough. Review production records and request a video inspection when travel is difficult. Small gaps often reveal weak process control.
Check certifications against your destination market, not just a supplier’s sales brochure. Request valid certificates, test reports, and the exact product models they cover. Confirm air tightness, water resistance, wind-load performance, thermal values, and coating durability. An ISO 9001 certificate supports process management, but it does not prove every window performs well. That distinction matters.
Compare pricing line by line. Include frames, glass, screens, hardware, packaging, testing, inland transport, and export documents. A low unit price can hide expensive upgrades later. Clarify whether quotations use EXW, FOB, CIF, or another Incoterm. Delivery terms deserve equal attention. Confirm production lead time, loading dates, container capacity, and replacement procedures for damaged units. Use protective corner guards and moisture-resistant packaging. I have seen buyers overlook unloading equipment and local storage fees. That mistake can erase an attractive price. Keep payment milestones tied to drawings, inspection, and shipment documents. Yet flexibility should not replace verification. A supplier may appear responsive during negotiation, then struggle with detailed revisions. Test that reliability before placing a large order.
Tip 1: Confirm the sample before ordering. Request a full-size corner sample when possible. Check frame thickness, surface finish, drainage holes, gasket fit, and hardware movement. A small color chip can hide visible texture differences. Measure the sample against your approved drawings. I once trusted a catalog image and missed a glazing bead detail. That mistake was costly.
Tip 2: Read the warranty line by line. Confirm coverage for frames, glass, hardware, powder coating, and seals. Check the warranty period and its starting date. Ask which defects are excluded and who pays freight for replacement parts. Request written terms in clear English. Keep approved samples, invoices, drawings, and inspection records together. Verbal promises are difficult to enforce.
Tip 3: Clarify installation and after-sales support before payment. Confirm wall opening tolerances, fixing methods, sealants, drainage requirements, and local weather conditions. Ask whether installation guidance includes drawings or video instructions. Your contractor should understand the window system, not just general construction. Also confirm response times for damaged units, missing parts, and technical questions. Take photos when goods arrive. Count every frame and inspect packaging immediately.
One detail deserves reflection. The cheapest quotation may exclude flashing, screens, handles, or site adjustments. Ask for a complete delivery scope. I have learned that unclear responsibility creates more delays than manufacturing defects. A reliable supplier should answer specific questions with documents, not confidence alone.
Key verification areas: samples, warranties, installation, quality documents, and after-sales support
This practical priority framework rates each purchasing checkpoint from 1 to 5. Buyers should approve physical samples, confirm technical performance and warranty terms in writing, define installation responsibilities, and agree on inspection, spare-parts, and after-sales procedures before placing an order.
Share the location, climate, building height, orientation, floor level, and nearby noise sources. Coastal sites face salt spray and driving rain. High-rise windows may need stronger wind-load performance.
Request complete-window test reports for air leakage, water penetration, and structural pressure. Catalogue claims are not enough. Numbers reveal more than showroom impressions.
Aluminum transfers heat easily. A continuous insulating strip can reduce unwanted heat flow through the frame. Check the whole-window U-factor, not the frame alone.
A lower U-factor usually limits heat loss in colder regions. A lower SHGC can reduce solar heat in hot, sunny locations. Climate matters.
Compare whole-window performance, not glass thickness alone. Check U-values, coatings, spacers, seals, and condensation risks. More layers are not always better for every climate.
Corners should feel rigid, with clean welds or tight mechanical joints. Look for smooth surfaces and no sharp burrs. Ask for alloy type and wall thickness.
Examine corners, drainage openings, and edges for thin patches or pinholes. Review a physical sample outdoors. Small color differences can become obvious later.
Specify glazing and frame performance for the building’s height, location, and exposure. Verify applicable local code requirements. Glass alone is not the weak point; connections or installation may fail first.
Pause the comparison and request clarification. Ask for installation details and complete-assembly ratings. I would not guess from vague wording.
Choosing the right Aluminum Window requires more than comparing prices. Global buyers should first understand the available window types and the main components, then define performance requirements based on local climate, safety needs, and desired comfort. Careful comparison of frame quality, glazing options, and finishes can help balance durability, energy performance, appearance, and maintenance needs.
Before placing an order, evaluate suppliers by reviewing relevant certifications, quotations, production capacity, and delivery terms. Confirm product samples and clarify warranty coverage, installation responsibilities, and after-sales support in advance. A structured buying process helps buyers assess quality and costs, reduce misunderstandings, and select windows suited to the project’s requirements and schedule.

Kross Window